ESXi - Customizer GUI to inject multiple driver VIBs into your ESXi installer ISO
I've often heard that a barrier to giving VMware's ESXi a try is the burden of figuring out how to inject a driver/VIB (vSphere Installation Bundle) file into the installer ISO file. The big OEMs do it, like HP and IBM, but the home lab enthusiast may not really feel like learning VMware's official approach, nevermind the syntax.
With the recent cut-backs in drivers included with the ESXi 5.5 compared with 5.1, it seemed like a big problem to many. Turns out it isn't that big a deal, once you locate the fine work by Andreas Peetz (@VFrontDe) over on his VMware Front Experience site, using his GUI utility called ESXi-Customizer* (see article end below, for updated info). In this step-by-step walkthrough supplemented by a video, I add ASMedia SATA, Realtek network, and LSI RAID monitoring support. Quickly, simply, easily.
There are many ways to add driver bundles, but this article will focus on an actual example procedure I created for my own home lab. My vZilla build has the ASRock Fatal1ty Z68 Professional Gen3motherboard from 2011. It has Realtek 8111 based NICs on the motherboard that worked great on ESXi 5.1, but ceased being recognized, when it came time for the ESXi 5.5 installer to see those devices. This gave me the dreaded "No network adapters have been detected" message discuss by other Realktek owners here. So instead of merely adding a fully support NIC like the Intel I350-T2, why not just inject this driver, along with any other needed drivers, right into the install ISO? That way, when I create the bootable USB flash drive using Rufus, I've now have the ISO to create that install source that also becomes the install target, with full support for all my devices. No SSH or VIB install commands to remember.
Turns out the AHCI SATA ports on this motherboard by ASMedia also aren't seen by the ESXi 5.5, even though they worked fine on ESXi 5.1. This is described by Andreas in his recent How to make your unsupported SATA AHCI Controller work with ESXi 5.5 post. Then there's my LSI 9265-8i RAID controller for SSD caching reads/writes, which was never fully functional out of the box, requiring a VIB to get proper healthy monitoring going under all ESXi 5.x versions, described here. So the next hurtle was how to inject all 3 VIBs into the same ISO, given there is currently no multi-selection ability in the ESXi-Customizer VIB Browse button.
Here's the workaround I developed, where you create a custom ISO by adding the first VIB, then repeat with the second, using the new bigger ISO as the source for that second injection. Rinse, repeat. Details here.
Step by step to inject ASMedia, Realtek, and LSI VIBs into ESXi ISO:
1) Download the latest ESXi-Customizer
I put the ESXi-Customizer-v2.7.1.exe into my C:\VIBs folder. I then also took all 3 of my VIBs:
ASMedia ASM1062 (right-click, select "Save As" to download) (filename is sata-xahci-1.10-1.x86_64.vib) for SATA support on many popular motherboards, described here.Realtek 8111/8168 (right-click, select "Save As" to download) (filename is VMware_bootbank_net-r8168_8.013.00-3vmw.510.0.0.799733.vib) for networking adapter support, described here. LSI 9265-8i(right-click, select "Save As" to download) needs the Certified LSI SMIS VIB for RAID health, described here. I used the ESXi SMIS VIB file for my exact LSI 9265-8i RAID controller. Once downloaded, you'll need to extract the zip to locate the VIB within the extract to directory.
and put them into the same C:\VIBs directory, where I also put a copy of the original ESXi 5.5 installer called VMware-VMvisor-Installer-5.5.0-1331820.x86_64.iso.

2) Run the EXE
in my case, it was called ESXi-Customizer-v2.7.1.exe It auto-extracts to the same directory you ran it from
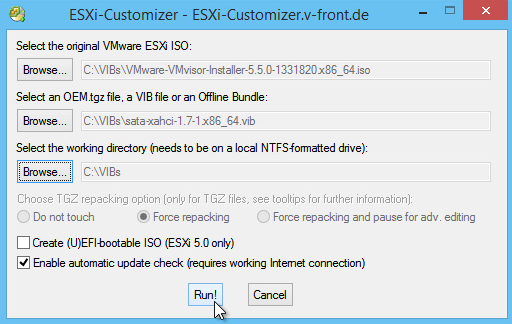
3) Run \ESXi-Customizer\ESXi-Customizer-v2.7.1\ESXi-Customizer.cmd
In the GUI that launches, choose the original ISO and the first VIB file, click 'Run'
4) Rename
the produced ISO from 'ESXi-5.x-Custom.iso' to indicate the first VIB injected

5) Repeat
Run 'ESXi-Customer.cmd' a 2nd time, choose the already customized once ISO and the second VIB file, click 'Run'
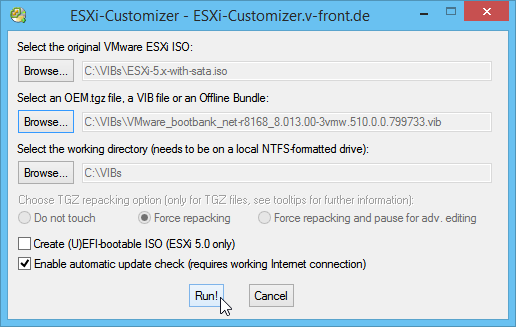
rename the produced ISO from 'ESXi-5.x-with-sata.iso' to indicate second VIB injected

6) Repeat again
Run 'ESXi-Customer.cmd' a 3rd time, choose the already customized twice ISO and the third VIB file, click 'Run'

rename the produced ISO from 'ESXi-5.x-with-sata-and-realtek.iso' to indicate three VIBs injected. In my case, that final filename wound up being called: ESXi-5.x-with-sata-and-realtek-and-lsi.iso

7) Burn into USB disk using Rufus that work perfectly
That's it!
I then used Rufus to make the install USB flash drive from that custom ISO, using the well documented TinkerTry procedure Rufus takes 2 minutes to create a bootable USB flash drive for ESXi installation.
Here's a quick look at the hardware visibility.


It was fun to create this simple video, and you have the assurance that method resulted in a fully functioning home lab for me, with all 3 of the added drivers performing as expected. Nice! A future video will show the entire lab build process, from start to finish.
No comments